Call Hillcrest Fence at 863-812-9397 NOW!
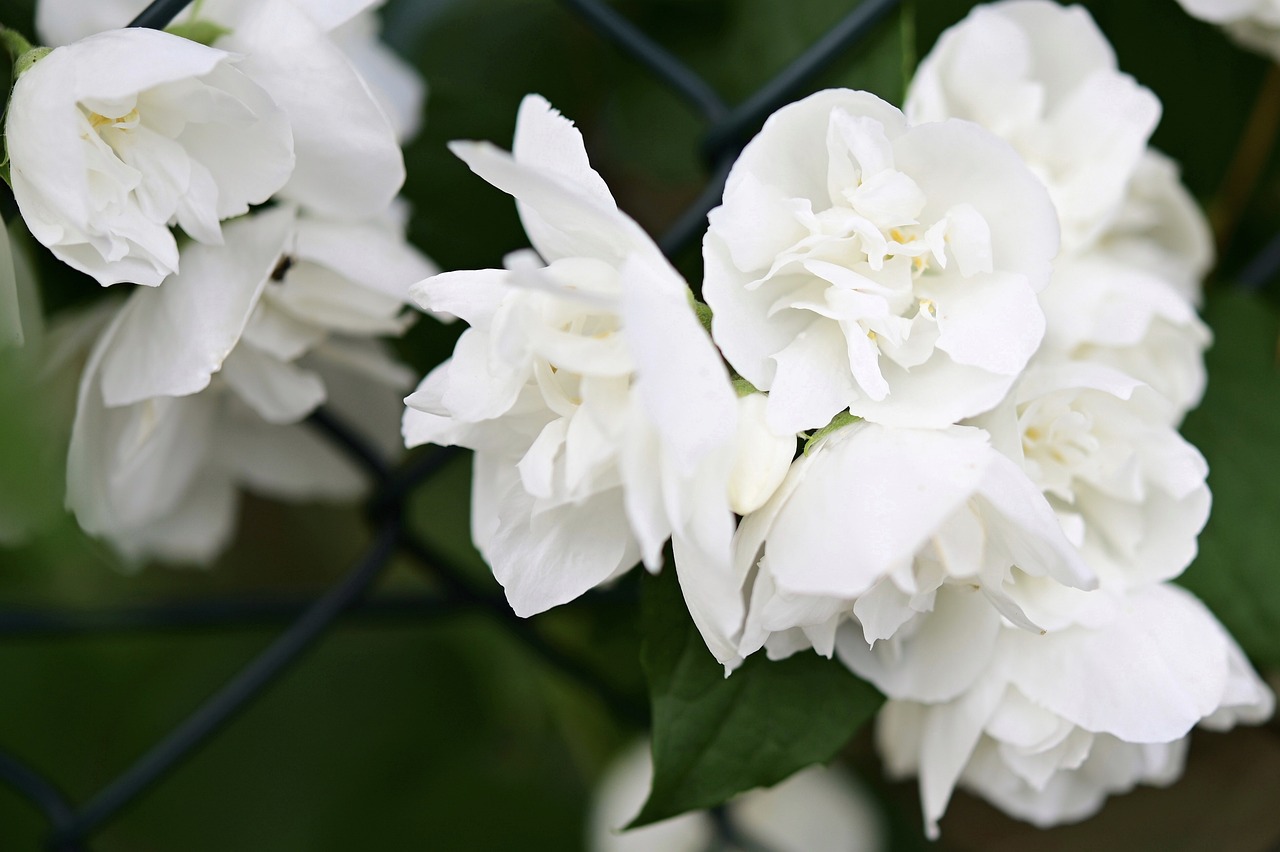
Adding Star Jasmine to your fence
Fences are not only functional structures that provide privacy and security for a property, but they also offer an opportunity to enhance the appearance and ambiance of a home. Adding plants and greenery to fences not only adds visual appeal, but it also helps to soften the hard lines and create a more welcoming atmosphere. One type of plant that is particularly popular for this purpose is star jasmine. Known for its beautiful white flowers and sweet fragrance, star jasmine can be a stunning addition to any fence. In this article, we will discuss the steps on how to successfully add star jasmine to your fence, from selecting the right variety to proper planting and care techniques. By following these guidelines, you can transform your plain fence into a lush and vibrant backdrop for your outdoor space. So, if you’re ready to elevate the look of your fence with this charming and versatile plant, read on to learn how to add star jasmine to your fence with ease and confidence.
Measure your fence for spacing.
Before adding star jasmine to your fence, it is crucial to measure the spacing between the fence posts accurately. This step ensures that the plants have sufficient room to grow and thrive without overcrowding or competing for resources. To begin, gather a measuring tape and position yourself at one end of the fence. Take measurements between each fence post, marking down the distances as you go. It is essential to maintain consistent spacing to create a cohesive and visually appealing display of star jasmine along your fence. Repeat this process for the entire length of the fence, ensuring that the measurements are precise and evenly distributed. By taking the time to measure your fence for spacing, you will set a solid foundation for the successful integration of star jasmine, enhancing both the aesthetics and functionality of your fence.
Choose a sunny, well-drained spot.
To ensure the optimal growth and health of your star jasmine, it is vital to carefully select a suitable location along your fence. Look for a sunny spot that receives at least six hours of direct sunlight each day. Star jasmine thrives in bright and warm conditions, so choosing an area with ample sunlight will promote vigorous growth and abundant flowering. Additionally, ensuring that the spot is well-drained is crucial, as excess moisture can lead to root rot and other detrimental issues. Avoid areas prone to standing water or heavy clay soils, as these conditions can impede the plant’s ability to thrive. By selecting a sunny, well-drained spot for your star jasmine, you provide the optimal environment for it to flourish and enhance the beauty of your fence.
Prepare the soil for planting.
To create an ideal foundation for your star jasmine, it is essential to properly prepare the soil before planting. Begin by clearing the area of any weeds, grass, or debris, as they can compete with the plant for nutrients and hinder its growth. Loosen the soil using a garden fork or tiller, breaking up any clumps and ensuring good drainage. Incorporate organic matter such as compost or well-rotted manure into the soil to improve its fertility and structure. This will also enhance moisture retention and provide essential nutrients for the star jasmine’s development. Prior to planting, it is advisable to perform a soil test to determine its pH level and make any necessary adjustments to create an optimal growing environment. By taking the time to properly prepare the soil, you set the stage for healthy root development and overall success in growing star jasmine along your fence.
Dig holes for the jasmine.
Once the soil has been adequately prepared, it is time to dig holes for the star jasmine plants. Using a garden shovel or trowel, create holes that are slightly larger than the root ball of each plant. Ensure that the holes are deep enough to accommodate the roots without bending or crowding them. It is recommended to space the holes evenly along the length of the fence, allowing enough room for the plants to spread and climb. As you dig the holes, be mindful of the placement, taking into consideration factors such as sunlight exposure and proximity to other plants. By carefully digging the holes for the star jasmine, you provide a stable and welcoming environment for the plants to establish their roots and thrive in their new fence-bound home.
Gently remove jasmine from pot.
To successfully transplant the star jasmine from its container to the fence, it is essential to handle the plants with care. Begin by gently gripping the base of the jasmine plant and carefully tipping the pot sideways. Supporting the root ball with your other hand, gently tap or squeeze the sides of the pot to loosen the plant. Once loosened, carefully lift the jasmine out of the pot, ensuring that the root ball remains intact. Be cautious not to tug or pull forcefully, as this can damage the roots or break the stems. Once removed from the pot, place the jasmine into the prepared hole, ensuring that it sits at the same level as it was in the container. Gently backfill the hole with soil, firming it around the base of the plant to provide stability. By delicately removing the jasmine from its pot, you ensure a smooth transition and encourage the plant to establish itself successfully on the fence.
Place jasmine in the hole.
Taking care to properly position the star jasmine in the designated hole is a crucial step in ensuring its successful growth on your fence. Once you have prepared the hole by digging it to the appropriate depth and width, gently place the jasmine plant into the hole, taking care not to disturb the roots. Position the plant in a way that allows it to grow upright and evenly on the fence. Take a moment to adjust the plant’s placement if necessary, ensuring that it is centered and aligned with the surrounding landscape. By carefully placing the star jasmine in the hole, you set the foundation for its growth and create an aesthetically pleasing addition to your fence.
Firmly pack soil around plant.
Ensure the stability and proper growth of the star jasmine plant by firmly packing the soil around it. Using your hands or a gardening tool, gently press the soil around the base of the plant, ensuring that there are no air pockets left. Firmly packing the soil will provide support to the plant’s roots and help establish a strong foundation for growth. Take care not to apply excessive pressure that may damage the roots or compact the soil too much. The goal is to create a stable environment that allows the roots to establish themselves and absorb nutrients effectively. By firmly packing the soil around the star jasmine plant, you contribute to its overall health and longevity on your fence.
Water thoroughly after planting.
To promote the successful establishment of the star jasmine plant on your fence, it is crucial to water it thoroughly after planting. This step ensures that the plant receives the hydration it needs to develop a robust root system and withstand any potential stress. After carefully planting the star jasmine, grab a watering can or hose with a gentle spray nozzle. Start at the base of the plant and evenly distribute water around the root zone, ensuring that the soil becomes moist but not waterlogged. This deep watering technique encourages the roots to grow downwards in search of moisture, promoting stability and resilience. Remember to monitor the moisture levels regularly and adjust your watering schedule accordingly to maintain optimal conditions for the star jasmine’s growth and vitality.
Train vines to climb fence.
To create a beautiful and lush green fence adorned with star jasmine, it is important to train the vines to climb the structure effectively. Begin by gently tying the young shoots of the star jasmine to the fence using soft garden twine or plant ties. As the plant grows, continue to guide and secure the vines, ensuring they follow the desired path along the fence. This can be done by attaching them to trellises, wire frames, or simply weaving them through the fence gaps. Regular monitoring and adjustments may be needed as the vines grow and expand. By providing proper support and training, you can achieve a stunning and well-structured display of star jasmine cascading along your fence, enhancing the aesthetic appeal of your outdoor space.
Prune regularly for healthy growth.
Regular pruning is essential for maintaining the health and vitality of your star jasmine vines on your fence. Pruning helps to remove dead or damaged branches, promote better air circulation, and encourage new growth. It is recommended to prune star jasmine annually during the dormant season, typically in late winter or early spring. Start by removing any weak or crossing branches, as well as any suckers that may have emerged from the base of the plant. Additionally, thin out dense areas to allow more light to reach the inner portions of the vine. Be sure to use clean and sharp pruning tools to make clean cuts, avoiding any tearing or crushing of the branches. By regularly pruning your star jasmine, you can promote healthier growth, keep the plant manageable, and ensure its overall longevity.
In conclusion, adding star jasmine to your fence can not only add a beautiful and fragrant element to your outdoor space, but it can also provide privacy and shade. With the proper tools and techniques, this project can be easily accomplished by any homeowner. Take the time to properly prepare the soil and ensure proper spacing for the plants, and you will be rewarded with a stunning and functional addition to your fence. Happy gardening!
To start your jasmine fence project, contact the best fence company in Polk County Florida. Call Hillcrest Fence at 863-812-9397 NOW!
FAQ
WHAT IS MY FIRST STEP TO GET MY STAR JASMINE FENCE?
Get your fence wuote NOW by calling the best fence contractor in Central Florida, Hillcrest Fence at 863-812-9397!
What is the best time of year to plant star jasmine on a fence?
The best time to plant star jasmine on a fence is typically in the spring or fall when the weather is milder and there is less stress on the plant. Spring allows the plant to establish roots before the heat of summer, while fall planting gives it time to settle in before winter. Both seasons provide optimal conditions for growth and establishment.
What type of soil is best for star jasmine to thrive when planted on a fence?
Star jasmine thrives best when planted in well-draining, fertile soil that is slightly acidic to neutral. A loamy soil type with good organic content is ideal for promoting healthy growth and flowering. It is important to ensure the soil is not too compacted, as this can hinder root development. Adding compost or mulch can help improve soil quality and moisture retention, which is crucial for the vigorous growth of star jasmine when planted along a fence. Regular watering and occasional feeding with a balanced fertilizer can also help maintain optimal soil conditions for this plant to thrive.
How much sunlight does star jasmine need when grown on a fence?
Star jasmine typically needs at least 6-8 hours of sunlight per day when grown on a fence to thrive and produce abundant blooms. It is important to ensure that the plant receives adequate sunlight to promote healthy growth and flowering.
What is the best method for training star jasmine to climb a fence?
One effective method for training star jasmine to climb a fence is to tie the plant’s stems to the fence using soft garden twine or plant ties, gently guiding them upwards as they grow. It is important to regularly check and adjust the ties to ensure the stems are securely attached but not constricted. Additionally, pruning the plant to encourage upward growth and removing any side shoots that may hinder its climbing abilities can help promote vertical growth along the fence. Regular watering and fertilizing will also support healthy growth and climbing.
How often should star jasmine be watered when planted on a fence?
Star jasmine should be watered deeply once or twice a week when planted on a fence, allowing the soil to dry out slightly between waterings. It is important to monitor the plant during hot and dry periods to ensure it is receiving adequate moisture. Overwatering should be avoided as it can lead to root rot.
Call Hillcrest Fence at 863-812-9397 NOW!
Table of Contents
Toggle